

Air in the anti-lock braking system is a serious issue you need to fix immediately.
This will cause lots of overheats in the brake lines. You may also experience the brake pedal depressed, or it even goes to the floor.
A scan tool with bleeding functions can be quite expensive. But you can totally do it without spending that much money.
Let me show you how!
Step 1: Know your brake bleeding order

It’s very important that you bleed the ABS module in the right order. Otherwise, you can never get all the air in the system out.
As a rule of thumb, you need to bleed the wheel that has the furthest brake line to the ABS module.
So, the bleeding order will be different among cars because they have various brake line systems.

However, you still need to look up on the internet with the keyword “year make model brake bleeding order” to make sure you get the correct order. The short video below will explain more about it.
If you can’t find your car’s brake line layout anywhere, keep moving on step 2. From the brake master cylinder (usually in front of the driver seat), follow the brake line to find the ABS module.
From there, follow those lines (you have to get under the car to do so) to figure out which line is the longest. And you got your bleeding order!
Step 2: Remove the wheels
Jack up your car on flat, solid ground.
Next, place the jack stand under the jacking point and lower the car onto the jack stand.
Use a lug wrench or a 1/2″ breaker bar to remove the lug nuts. If you have an impact wrench, that’s great. Just remember to use impact sockets for your own safety.
Step 3: Top up new brake fluid
Before you move on, check the fluid inside the brake master cylinder.
If the fluid level is too low, top it up with clean brake fluid until it reaches the “MAX” mark. There are two things about the master cylinder you should always keep in mind during the process.
First, make sure the brake fluid level is NOT 10% below the “MAX” mark. If the fluid gets too low, the brake system will take in a big chunk of air, which is an absolute nightmare you don’t want to happen. It’s better to be safe than sorry!
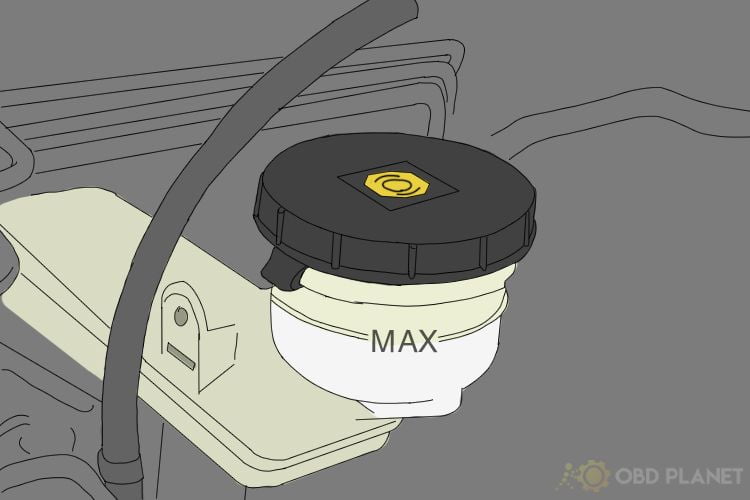
Second, always close the master cylinder cap properly.
Step 4: Locate caliper bleeding screws

Step 5: Attach the bleeder bottle
You can easily buy a bleeder bottle online. They are easy to use, and they are darn cheap!
Or you can make a DIY bleeder bottle using a 3/16″ transparent hose, a plastic bottle, and zip tight. Just drill a hole on the bottle cap and put the hose through it. Use a zip tight to fix the hose to the cap so that it does not slip during the process.
Before you attach the bottle, fill one-third of the bottle with clean brake fluid (the bottle must be clean dry). And make sure the fluid level is above the hose inside the bottle. The reason is that when you release the brake pedal, the system will suck air in if the bottle is empty. We want to go one step ahead by putting the fluid inside the bottle. In this way, the brake system will pull in clean brake fluid instead of air.
So, it should be something like this:

The next thing you need to do is to attach the hose to the bleeding screw. Make sure it’s snugly fit. And then use a wrench to loosen the bleeding screw. Remember it’s “loosen”, not “open”.
An 8mm (or 5/16″) wrench will do the job. In some vehicles, you may need a 10mm (or 3/8″) wrench.
Usually, these crews will break loose quite easily. But when they don’t, penetrating oil will help. Just don’t try so hard, you may strip the nut, and it becomes unremovable. An absolute nightmare!

Step 6: Ask someone to pump the brake pedal
Slowly press the brake pedal all the way down to the floor.
You will see the old fluid and air bubble coming out. And then slowly release the brake.
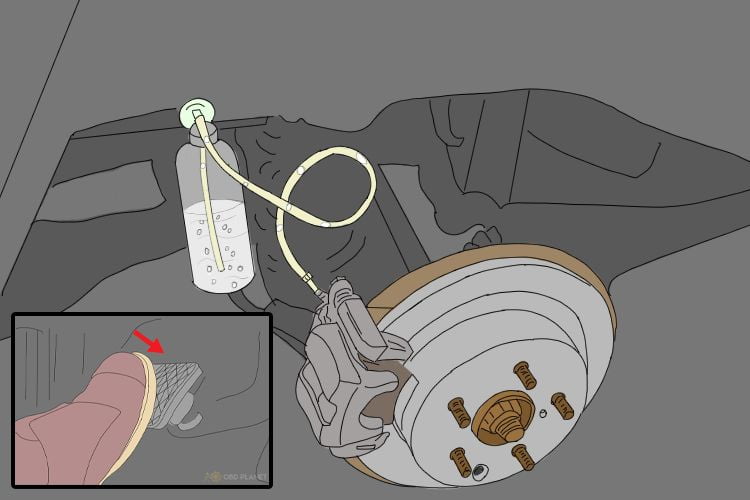
Repeat the process a few times until you see a constant stream of brake fluid, no air bubble.
Step 7: Tighten the bleeding screws
When there is no air bubble left, use the wrench to tighten the bleeding screws. Make sure it’s really tight.
But please don’t take my advice too seriously and hammer the wrench.
Carefully remove the hose. You don’t want the fluid to spill all over the place. It will eat your car paint!
If your bleeding bottle is too full, pour some of the fluid out. Store it somewhere safe so that you can dispose of it properly at recycling centers or auto parts stores.
Step 8: Check the brake fluid again and move on to the next wheels
Before you move on to bleed the wheels, check the master cylinder.
Once again, always make sure the level is not 10% below the “MAX” mark. Top it up with more brake fluid if necessary.
After that, get back to step 4 with the next wheel. And then, when you’re done with bleeding that wheel, come back and check the fluid again.
The circle continues until you finish bleeding all four wheels.
At this point, when you press and release the brake pedal abruptly, the fluid in the master cylinder should not show any significant eruption. If it does, you may do something wrong, and there is still air inside the system.
Step 9: Put the wheels back on
After double-checking that all bleeding screws have been tightened properly, put the wheels back on.
Always finish tightening the wheel using a torque wrench, ensuring the lug nuts are torqued to the right specs.
And boom, you’re good to go!